{article.name}

Concrete Basics - How To Do a Slump Test
On site, the accepted way to gauge and control water content is the slump test. To do the test properly, use a standard cone 12 inches high, 4 inches wide at the small end, and 8 inches wide at the big end. You fill the cone up about 1/3 full, rod it 25 times, fill it up to 2/3 full, rod it 25 more times, and then finally fill it to the top and rod it again. Then you remove the cone and measure the slump from the top down. This picture shows a 9-3/4-inch-slump concrete - a very pourable concrete.
Although the slump test is basic concrete practice, not everyone understands it. I've even seen guys measure from the bottom of the pile of concrete up instead of from the top of the cone down. Then they'll say, "I'm doing a 2-inch slump concrete." If they understood the test they'd know they have a 10-inch slump, not a 2-inch slump. That's a pretty wet mix.
On site you have to make a practical compromise between workability and maximum strength. In the American Concrete Institute (ACI) Committee 332, which I belong to, we're creating updated standards for residential concrete, and have spent a fair amount of time discussing slumps. Some of the ready-mix guys have argued for the 4-inch slump, but 4-inch-slump concrete is pretty tough material to pour, unless you are going to pump it. All the poured-wall guys wanted to go to a 7-inch slump. In the end, we worked out a compromise: a 4-inch to 6-inch range.
Concrete work is heavy labor, and there's an understandable desire to pour a higher slump, just to make the concrete more flowable. Suppose you go ahead and increase the slump by adding water? As a rule, it takes a gallon or more of water per yard to add about an inch to your slump. So to increase the slump from 5 inches to 9 inches, you'd need to add about 4 or 5 gallons. That could reduce the strength of your finished concrete by as much as 1,000 psi.
If you need such flowable concrete, you should get your supplier to teach you about superplasticizers. If you start with a 5-inch slump and then superplasticize it, you can get an 8-inch or 9-inch slump that is relatively easy to work with. And because you don't have to add water, you've maintained good strength.
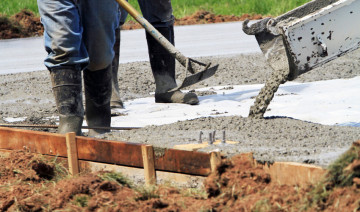
Handling Concrete
Very flowable concrete is the easiest concrete to pour. When you see concrete slurping down the chute like this, it's a good bet that the crew has souped up the concrete with a lot of water. I call this technique "irrigating the forms."
Now, you can do a good job with very flowable concrete if you move the chute and puddle the concrete where it is intended to be. But if you dump a whole lot in one corner and then pull it along the form with hoes, the aggregate starts coming out of the flow and separating from the cement. Where there's a lot of gravel in one place and not enough cement, the result is honeycombing. A result like this usually means that someone tried to make the concrete flow too far. You can also see the results here as visible lines in the wall.
You'll also get lines like that if there's a delay between one lift of concrete and the next, especially if you pour a wall in hot weather. Once you start a wall pour, it's best to keep the concrete coming at a steady rate, and not allow part of the wall to set up before the next lift is placed on top of it.
You should also consolidate each lift in a wall as you place it. Very flowable concrete can be consolidated by rodding it with a steel rod; stiff concrete is better consolidated with a vibrator. But if you have a high-slump mix, over-vibrating can create problems: It causes the gravel and sand to segregate out from the cement, and increases the pressure on the forms, which may cause you to pop a pin on a snap-tie, causing the wall to "pillow" out. One popped pin is more of an aesthetic problem than a structural problem, but too much pressure on the forms could cause a blow-out.
Vibrating is appropriate when you use wood forms or steel forms. Contractors with aluminum forms have to be very careful vibrating, because the aluminum forms are somewhat deflectable and may pillow from the pressure.
Use the vibrator to consolidate the concrete in place and get the big air bubbles out of it. Don't use the vibrator to move the concrete from one spot to the next - that typically creates segregation. And while it's not a big deal if the vibrator bumps up briefly against the steel (in fact, this probably improves the steel-to-concrete bond), you don't want to deliberately vibrate the steel by holding the vibrator to the rebar. That could actually weaken the bond between steel and concrete.
There's a lot more to learn about building with concrete - things like how to use admixtures, how to control cracking, how to deal with cold or hot weather, how to cure concrete, and when, how, and where to place reinforcing steel. But if you start with the basics - choosing the right cement, using large, well-graded aggregate, keeping the water content down, and placing and consolidating carefully - you're off to a good start.
Comments